Jenkins High Availability setup
Target Audience: Devops/SRE Practitioners, Technologists and Enthusiasts who appreciate the need for High Availability in their Jenkins setup.
Are your Jenkins instances setup for High Availability? How about federated CI/CD using Slave instances? Did we also hear “backup”?
In case of a standalone Jenkins setup, if the Jenkins instance fails, all the configuration/jobs data on the node may be lost. Restoring the data/os-image through enterprise backup & restore solutions may not be trivial and may prove to be expensive. There are a few paid and expensive alternatives available that offers a clustered Jenkins setup.
Today, we shall attempt to create a near-replica of the paid solution using free/community software. Please write to [email protected] if you have questions.
TL;DR
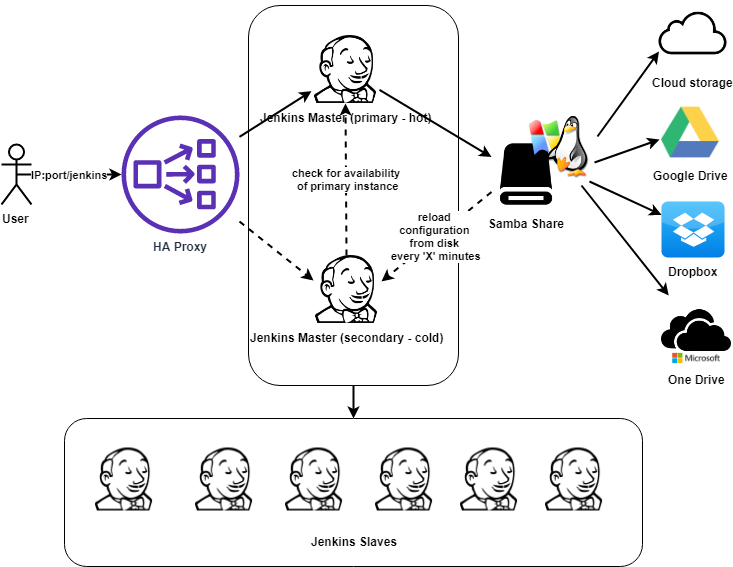
- Mount a shared drive/partition for writing all data.
- Create a primary jenkins master and configure it to use the shared drive.
- Create a secondary jenkins master and configure it to use the shared drive.
- Configure HA Proxy to for high availability. Redirect traffic to the primary as long as it is up; to the secondary otherwise.
- On the secondary jenkins master: write a cron-job to reload the configuration.
- Advanced cron-job to “stop” reload of configuration when secondary transitions primary.
- Provision for backup – (enterprise backup strategies – on prem or cloud / google drive / box etc.)
- Scalability through jenkins slave instances.
1Mount a shared drive/partition for writing all data.
Falling through here implies that I have your attention. So, let’s explore the whole setup in detail. This exercise assumes we are working on CentOs7 and JDK 8 (Either Oracle JDK or Open JDK as per your preference). You should be able to achieve the same on other compatible OSes by making minor changes to the steps I have detailed below.
The whole idea revolves around configuring Jenkins Nodes to read/write to a Shared Drive/location; such that whatever changes to jobs/configuration is being done on the Primary node is available to the Secondary instance as well. Therefore, a Samba-share is created which shall be accessible from both the Jenkins Instances. Here are the steps to be followed:
We shall install samba on CentOs 7
sudo yum install samba samba-client
start the services
sudo systemctl start smb.service

sudo systemctl start nmb.service
enable auto start on reboot
sudo systemctl enable smb.service

sudo systemctl enable nmb.service
(optional) if firewall is active, allow through firewall
firewall-cmd --permanent --zone=public --add-service=samba

firewall-cmd --zone=public --add-service=samba
configure directories
sudo mkdir /sambashares
create samba group
sudo groupadd sambashare
change group ownership of samba directories
sudo chgrp sambashare /sambashares
create samba user
sudo useradd -M -d /sambashares/jenkins_admin -s /usr/sbin/nologin -G sambashare jenkins_admin
create the user’s home directory and set the ownership
sudo mkdir /sambashares/jenkins_admin

sudo chown jenkins_admin:sambashare /sambashares/jenkins_admin
everyone in the group can access files
sudo chmod 2770 /sambashares/jenkins_admin
create the user on samba database. create a password when prompted.
sudo smbpasswd -a jenkins_admin
enable the user on samba
sudo smbpasswd -e jenkins_admin
configure samba shares
sudo vi /etc/samba/smb.conf
   [jenkins_admin]
    path = /sambashares/jenkins_admin
    browseable = no
    read only = no
    force create mode = 0660
    force directory mode = 2770
    valid users = jenkins_admin
restart the services
sudo systemctl restart smb.service

sudo systemctl restart nmb.service
Create a primary jenkins master and configure it to use the shared drive.
The Primary Jenkins Master must be installed and configured to write all the jobs/related configuration data to a Shared location. Later we shall configure the Secondary Jenkins Master instance to read this information from the Shared location and update the same on it’s own node (while primary is up). Here is how we do so:
2Install openjdk/jre on CentOs 7
3Create a user “jenkins”, create a password when prompted
Create a directory jenkins under /home/jenkins
mkdir -p /home/jenkins/jenkins
Change the directory
cd /home/jenkins/jenkins
Download jenkins.war
wget http://mirrors.jenkins.io/war/latest/jenkins.war
Change permission
chmod 744 jenkins.war
Configure sambashare password file
    vi /home/jenkins/.smbcredentials

        username=jenkins_admin
        password=<your samba password>
Install samba client
sudo yum install samba-client
Install cifs utils
sudo yum install cifs-utils
Mount the Samba share
//<Samba Server IP>/jenkins_admin /home/jenkins/.jenkins/jobs cifs uid=jenkins,gid=jenkins,credentials=/home/jenkins/.smbcredentials 0 0
Start the Jenkins instance and note down the hash-key for creating the first admin user that appears on the console
java -jar jenkins.war &
Launch the web-ui from a browser http://<this_server_ip>:8080
Use the hash-key from the console log to create the user and password for the admin user
Create a secondary jenkins master and configure it to use the shared drive.
Follow the same process as detailed for primary jenkins master. Please ensure the admin user/password for both the instances (primary and secondary) are same.
Configure HA Proxy to for high availability. Redirect traffic to the primary as long as it is up; to the secondary otherwise.
HA Proxy is configured to perform a availability check on the Primary Jenkins instance. As long as the Primary Instance is up and running, traffic from the user is relayed to the it. When HA Proxy detects a failure, it starts redirecting traffic to the Secondary Jenkins instance instead of the Primary. To configure, we have to:
Install HA Proxy
yum install haproxy
Make changes to the HA Proxy configuration
    vi /etc/haproxy/haproxy.cfg

    // remove everything apart from the "global section" and add the following instead

    defaults
        log global
        maxconn 2000
        mode http
        option redispatch
        option forwardfor
        option http-server-close
        retries 3
        timeout http-request 10s
        timeout queue 1m
        timeout connect 10s
        timeout client 1m
        timeout server 1m
        timeout check 10s

    frontend ft_jenkins
        bind *:8080
        default_backend bk_jenkins
        reqadd X-Forwarded-Proto:\ http

    backend bk_jenkins
        server jenkins1 <primary_jenkins_ip>:8080 check
        server jenkins2 <secondary_jenkins_ip>:8080 check backup
On the secondary jenkins master: write a cron-job to reload the configuration.
The Secondary Jenkins instance should keep reloading the configuration being writted to the disk (Shared Drive) by the Primary Instance. This may be achieved by configuring a cron job to run a custom reload script on the Secondary Jenkins instance.
Create a file with Jenkins Admin User credentials
    vi /home/jenkins/jenkins/jenkins_credentials

    admin:<password_of_admin_user>
Change permission
chmod 600 /home/jenkins/jenkins/jenkins_credentials
Download jenkins-cli.jar from the local server
    cd /home/jenkins/jenkins
    wget http://<jenkins_secondary_server_ip>:8080/jnlpJars/jenkins-cli.jar
Create a file /home/jenkins/jenkins/jenkins-reload.sh
    vi /home/jenkins/jenkins/jenkins-reload.sh

    #!/bin/sh
    java -jar /home/jenkins/jenkins/jenkins-cli.jar -s http://<jenkins_secondary_server_ip>:8080/ -auth @/home/jenkins/jenkins/jenkins_credentials reload-configuration
Change permissions
chmod 700 /home/jenkins/jenkins/jenkins-reload.sh
Configure cron daemon
    vi /etc/cron.d/jenkins-reload

    */1 * * * * jenkins /bin/bash /home/jenkins/jenkins/jenkins-reload.sh
Advanced cron-job to “stop” reload of configuration when secondary transitions primary.
In the event of a failure of the Primary Jenkins instance, HA Proxy shall redirect all traffic to the Secondary Jenkins instance. In such a scenario, the Secondary Jenkins instance should no longer try to reload the configuration from the disk. In order to achieve that we must replace our cron job script with:
Update the cron job
    #!/bin/sh
    # check if primary is up or not
    java -jar /home/jenkins/jenkins/jenkins-cli.jar -s http://<jenkins_primary_server_ip>/ -auth @/home/jenkins/jenkins/jenkins_credentials list-jobs
    PRIMARY_STATUS=$?

    echo ${PRIMARY_STATUS}

    if [ 0 == ${PRIMARY_STATUS} ]
    then
        echo "Primary is up"
        echo "Reloading secondary"
        java -jar /home/jenkins/jenkins/jenkins-cli.jar -s http://<jenkins_secondary_server_ip>:8080/ -auth @/home/jenkins/jenkins/jenkins_credentials reload-configuration
    else
        echo "Primary is down"
        echo "Skipping reload"
    fi
Provision for backup – (enterprise backup strategies – on prem or cloud / google drive / box etc.)
Recommend you work with your IT Administrator for incremental backup of data from Samba Share. This will ensure you have an option to restore your Jenkins jobs and related configuration data in the event of a disk/Samba Server failure.
In absense of a enterprise backup solution, you may want to configure free/paid cloud backup solutions like Google Drive, Dropbox, Microsoft OneDrive etc. to take a backup of this shared location.
Scalability through jenkins slave instances.
References
Note:
This article is intended for educational and knowledge sharing purposes only.
There is no commercial liability or obligation associated with it. You are free to share this document AS IS without making any changes without written consent of the author.
The author does intend to promote or undermine any specific brand, software or device. The views expressed in this article are purely held by the author which may change over a period of time without any liability.
By following the instruction(s) in this article (if at all), you are deciding to act on your own and you alone shall be accountable & responsible in case of any loss or damage that you shall incur as a result of implementation of said instructions.